With a lot of the recent nonsense going on after VMware was acquired last year, I’m seeing people start to look for ESX alternatives - especially for home labs. In fact, I also just migrated my home lab from ESX to Proxmox.
One of the things I needed to keep running was Cisco Modeling Labs (CML). I often use CML to build quick virtual topologies for testing things, so it was important for me that it worked on Proxmox.
It’s worth noting that Proxmox isn’t an officially supported platform. The docs state that only bare metal & VMware platforms are supported.
That being said, I’m happy to say that Proxmox has worked just fine for me - it just needed a few tweaks. Though just be warned that you may still run into issues and it is technically an unsupported configuration.
In the post below, I’ll share the steps that I used to get CML up & running on Proxmox.
Prerequisites
To start with, we’ll need a few things:
- A server running Proxmox
- I’m currently using version 8.1.3
- A CML install ISO, found here
- We’ll be using version 2.6.1 for this guide
- CML’s reference platform ISO, also found at the link above
Our Proxmox machine will still need enough resources to build a VM with the minimum requirements listed here.
The CML & refplat ISOs should be placed into a Proxmox ISO storage location.
Creating the VM
Next we can get to the fun part: Setting up the VM in Proxmox.
We’ll first locate a node in Proxmox to place our VM. Then right-click that node & select Create VM:

Then, we’ll give our VM a name & ID. I’ve named mine CML:

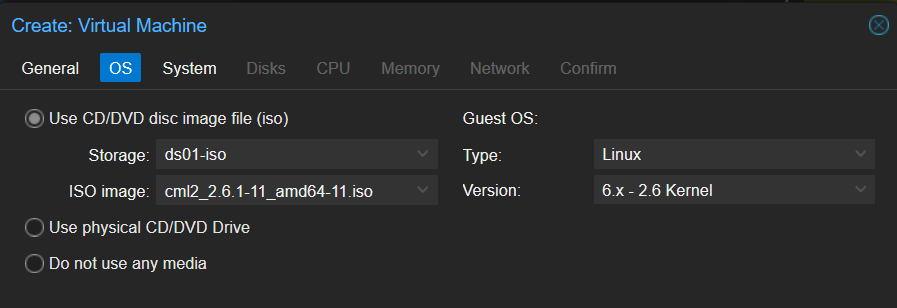
On the next page, we can select our CML ISO from the correct storage device. We can leave the Guest OS as Linux and 6.x - 2.6 Kernel:
Next, we’ll need to make some minor adjustments on the System tab.
The default BIOS will likely be set to Default (SeaBIOS). We’ll change that to OVMF (UEFI), which will also give us a few additional options.
We’ll keep Add EFI Disk checked, and select a storage location for that EFI disk.

On the Disks tab, feel free to increase the size of the VM disk. While 32GB is the minimum required, you’ll likely want more than that. I’ve increased mine to 50G for now. Keep the image format as QEMU.
We’ll also want to update the Async IO setting to native. This is hidden under the Advanced settings:

On the CPU tab, we’ll update the core count to a minimum of 4 per the requirements. Of course, you’re welcome to increase this as needed.
More importantly however, we’ll need to set the CPU type to host. This allows the VM to use the underlying nested virtualization features:

Next we can assign memory to our VM.
The requirements state a minimum of 8GB, however this will likely only accommodate simpler labs. Some individual CML nodes require more than that to start.
In my case, I’ll start with 32GB - and we can always increase this later:

Lastly, on the Network tab, no changes are necessary. Of course, you can assign a VLAN if needed.

After that, we can head over to the Confirm tab & finish up the wizard.
Add Refplat ISO
Next, we’ll need to make sure our reference platform ISO is connected to the VM.
We’ll head over to the VM’s hardware tab, then click Add and select CD/DVD Drive:

Then we’ll select the appropriate ISO storage, and pick our refplat ISO file:

Install CML
Once that’s done, we can go ahead and power on our VM & pop open the console!
If you’ve installed CML previously on another platform, this process is just the same.

At boot, we’ll select Install CML.
After a moment & a few screens, we’ll start the system configuration.
First, we’ll input a system hostname:

Then, we’ll input credentials for the system management user.
Note: This user isn’t used to log into the CML software. Rather, it’s used for system administration tasks via the Cockpit UI, such as: Installing updates, checking logs, joining a domain, or powering off / rebooting the system.

After that, we can configure our CML admin user:

Next we have our network config. By default, CML will prompt to use DHCP, but we’ll likely want to change this to a static IP assignment:


After that, CML will prompt us to confirm our settings - then it will begin the installation. Since a lot of the VM images come from the reference platform ISO, this process may take a while as each of those images are copied over to the system.
When CML is ready, we’ll see something similar on the console telling us how to reach the web UI:

Again for reference, the main UI is reachable at https://<CML IP> and the Cockpit management UI is at https://<CML IP>:9090.
At this point, we can log in & start building labs!
The process for setting up CML on Proxmox isn’t super crazy, but there are just a few tweaks that need to be made during setup. I wrote this hoping that if anyone else out there is trying to set this up, maybe it would help.
As always, Thanks for reading!
